How to Import OST to Outlook 365?
Nothing is wrong in saying that the robust features of Microsoft Outlook 365 are loved by global corporates and executives. Efficient mailbox management in a cloud-based environment is loved by everyone. People who use Outlook for work or personal communication must be aware of the Offline Storage Table (.ost). This data file is one of the backbones of this email client. It is created automatically when you set up Outlook 365. It is heavily encrypted too. This data file can’t be opened in a different profile.
Understanding OST File:
Let’s decode the technical aspects associated with the OST data file:
- This data file is used in Exchange Server environments.
- It is created automatically.
- It is formed when the user configures Outlook to work in caching exchange mode.
- It interacts with the Exchange server.
- It enables users to access previously downloaded mailbox data such as email messages, contacts, etc. even without the Internet connectivity.
- -These data files are typically large in size.
- OST is linked with a specific profile.
- It is also secured with a MAPEntryID GUID key for data safety.
Why Users Need to Import OST to Outlook 365?
There are multiple scenarios where a user requires to import OST to Outlook 365. Some of such cases are discussed below:
- In the event of accessing old mailbox folders after the user has moved data to a new device.
- When the user has upgraded from old Exchange servers to Office 365.
- When the user accidently deleted an Outlook profile.
- To recover crucial data files from an orphaned or inaccessible OST.
Is Importing OST to Outlook 365 Challenging?
A user can’t directly import OST to Outlook 365. Let’s understand what prevents the direct import of OST mailboxes. In the above section, we have discussed that OST is a highly-secured data file. It is linked with a specific profile. This data file (.ost) is also encrypted with a unique MAPIEntryID key for enhanced data safety. So, it is meant for a specific environment. On the contrary, Outlook 365 is a cloud platform. We need to make this data file portable first by converting it into a PST format. After this, we can import OST to Outlook 365 environment. To know more about the subject, checkout our guide titled “How to Import OST to Outlook 365? Quick Solutions!” In this post, we will explore 1 manual method and 1 software-method to execute such import. In addition to this, this guide will also unearth a professional OST Converter tool.
Methods to Import OST to Outlook 365:
One of the popular queries in recent time is “How to Import OST to Outlook 365? Quick Solutions!” This part of the post will shed light on varied methods available for such import. Check the below guide:
Fix 1: Convert OST to PST, then Import the Converted File into Office 365: Under this manual method, a user needs to execute following steps:
Stage 1: Convert an OST file to PST format.
Stage 2: Upload the converted, portable file (.pst) to Azure Storage. The user can also ship this converted file to Microsoft’s data center.
Stage 3: Import PST file into Office 365.
Note: This method will only work if the profile is active as well as accessible. It will not work in case of deleted profile. It will also not work if the mailbox folders belong to old or disabled accounts. In all these cases, Fix no. 2 will work.
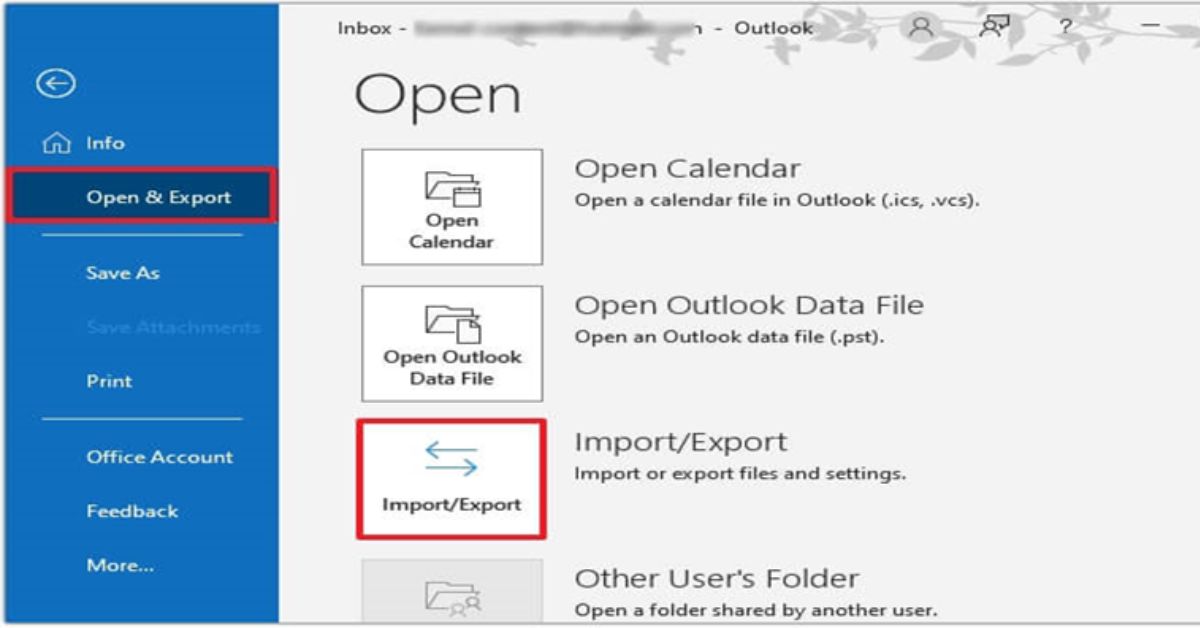
Stage 1: Convert OST to PST using the Import/Export Wizard: Navigate to the Outlook with the Exchange account that was used to create the OST files. Follow the below instructions:
- Navigate to the Files.
- Browse Open & Export.
- Then Press Import & Export.
- Click ‘Export to a file’ option, then hit on the Next tab.
- From the dropdown, choose the Outlook Data File (.pst). Click Next to proceed.
- Now select folders as well as sub-folders. Then click Next.
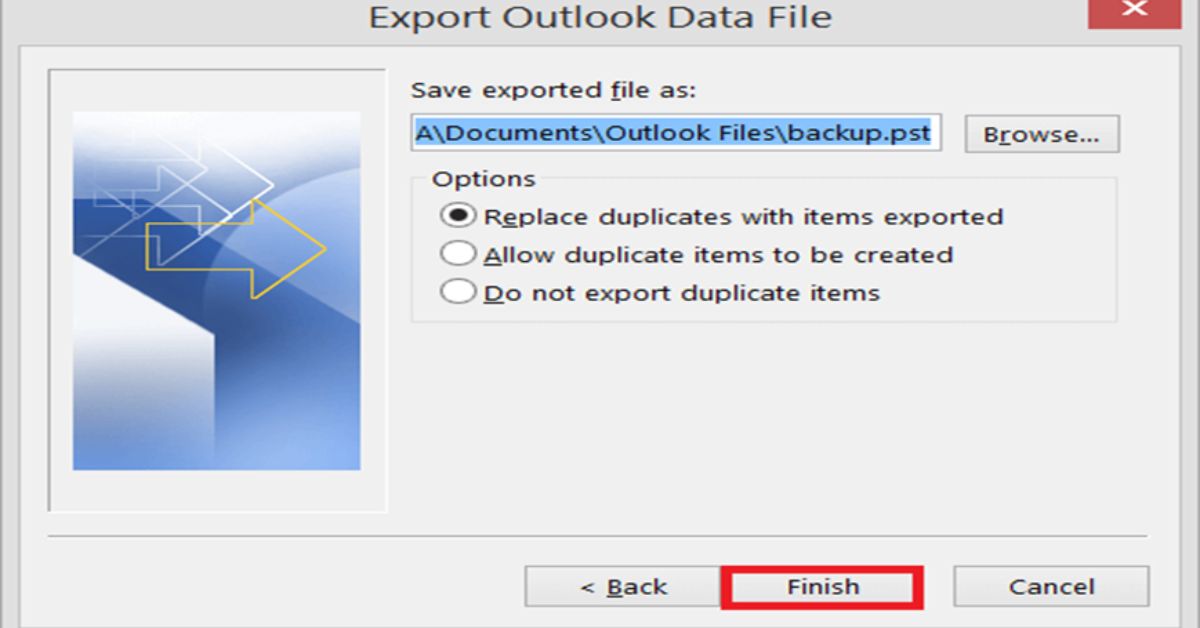
- Now go to the folder where you require to export the new PST files. Select ‘Replace duplicates with items exported’ option. After this click on ‘Finish’.
Stage 2. Upload Converted OST to Azure Storage/ Ship to Microsoft Data Center: So, you have successfully converted Outlook data file (.ost) to the PST format. The next step is to upload the converted file to Azure Blob storage using the Azure AzCopy. The user can also utilize the “Drive Shipping” method. Under this, the user requires to copy the converted data file (.ost) to a BitLocker-encrypted hard drive (2.5-inch). After this, the encrypted drive will be shipped to the Microsoft’s data center. The organization will upload the PSTs to Azure Blob storage on your behalf. The user needs to pay some fees for the same.
Stage 3. Import OST into Office 365: The last stage is the Office 365 account creation. After the account creation, the licenses will be assigned. The next stage is the CSV mapping file creation and its upload. The user needs to assign an Import Export role. After this, he needs to start the import job to import the converted OST files into Office 365 mailboxes. The process will take from several weeks to months.
Fix 2: Import OST to Office 365 using Converter Tool:
There is another relatively convenient method to quickly import OST to Office 365. The user can utilize any OST converter to perform such import. Experts advocate to utilize tools like Stellar Converter for OST (Technician) in such a scenario. Such tools use advanced algorithm. With robust features, these OST converter tools can quickly import OST to Outlook 365. The user can import a big OST (upto 50 GB) in few clicks. These tools also maintain original structure and folder hierarchy. What more? These tools also extract folders from inaccessible or orphaned data files (.ost).
The user needs to perform the below steps:
- Download and install the software.
- Browse it.
- Go to the main interface of the software.
- Select Choose Manually.
- After this, click Browse to select the OST file
(Note: You can also select inaccessible or orphaned OST files that belong to deleted or disabled mailbox profile.)
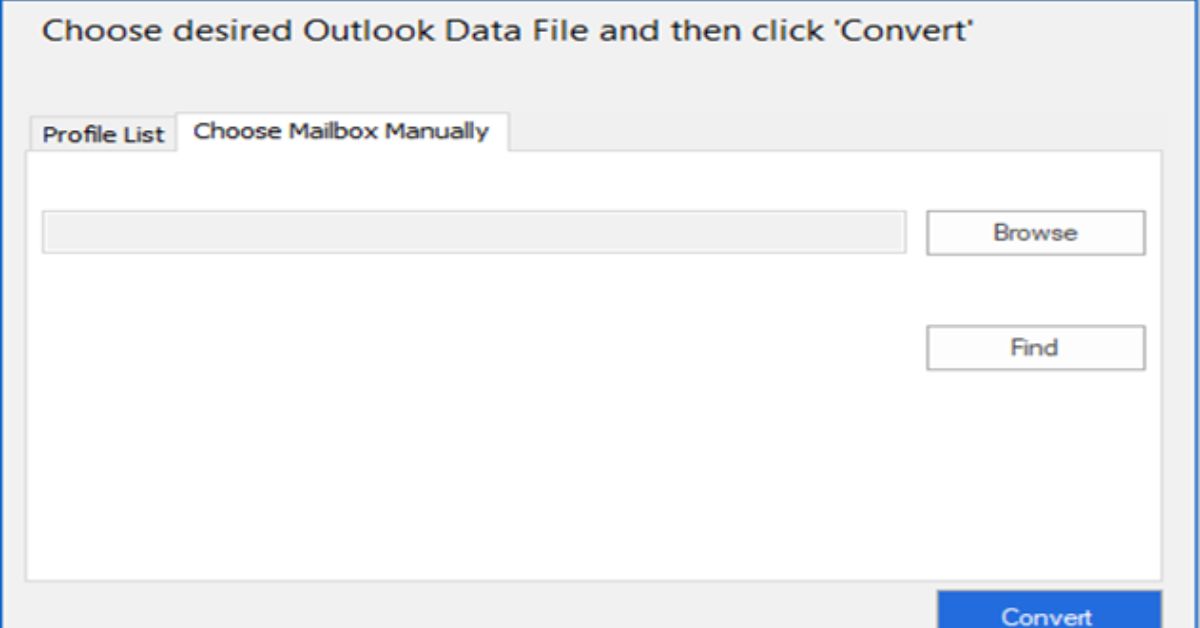
- Start the conversion by pressing Convert tab.
- With this action, the tool will list all mail items from the OST.
- Review the folders and validate the data.
Conclusion:
The above guide shared plethora of technical aspects of Outlook data file (.ost). After this we have explored multiple scenarios that demand the OST import to Outlook 365. We have also discussed why import OST to Outlook 365 is a challenging task. For the same, we have also discussed 1 manual method and 1 software-based method. The manual method is not only lengthy but also involves complex processes. On the contrary, the OST converter tool is reliable, quick and relatively easy to use. Experts strongly recommend software like Stellar Converter for OST. Such tools can handle OST of any size. Further, these tools maintain the file structure and hierarchy.